ski de rando

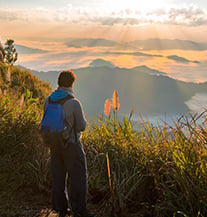
Ski touring is a mountain discipline that combines ski ascent, with the help of skins, and off-piste descent. Off the beaten track, it offers skiers a unique sense of freedom, allowing them to discover the mountains in their wildest form. This activity is accessible to those who want to get away from the crowds and explore new landscapes, where nature reveals itself in all its splendor.

Ski touring requires a good level of physical fitness and technical mastery of the skis, particularly to cope with the varied and unpredictable terrain. Unlike downhill skiing, where lifts make it easy to reach the summits, here the effort is intense and the pleasure has to be earned. This fast-growing discipline is attracting more and more mountain enthusiasts, as it combines physical effort, adventure and close contact with nature.
However, ski touring is not without its risks. Skiers and snowboarders must master the techniques of ascending and descending on ungroomed terrain, be able to assess avalanche risks and know the specific safety rules. Much more than just a sport, ski touring is an immersive experience in the world of the high mountains, requiring caution, respect for the environment and preparation.
Ski touring is much more than a sporting challenge: it's an invitation to discover the mountains in a different way, with a keen eye, a heightened awareness and a renewed appreciation of the beauty of the great outdoors.

Ski touring is an exciting way to discover the mountains away from the slopes, but it requires a great deal of preparation to ensure safety and pleasure. good ski touring equipment. Here are five essential tips for beginners and even those with a little experience:


1. CHOOSE AN ITINERARY SUITED TO YOUR LEVEL

In ski touring, it's crucial to adapt the route to your technical skills and physical condition. Start with easy, marked itineraries to familiarize yourself with the effort of ascending and descending on ungroomed snow. Find out about the difference in altitude and the duration of the trip, to avoid exhausting yourself.

Assess your physical condition and technical level

  • Ski touring uphill is more demanding than on groomed trails. Beginners should therefore avoid excessively high gradients or long distances that could quickly exhaust them. An outing with a vertical drop of 500 to 800 meters is generally suitable for beginner skiers, while more experienced tourers can envisage vertical drops of over 1,000 meters.
  • Off-piste descents are also much more technical than on piste, and the type of snow (powder, crusty, heavy) can vary considerably, making turns more difficult. If you're just starting out, opt for gentle, well-cleared downhill routes to avoid areas that are too steep or strewn with obstacles (such as trees or rocks).

Find out about the level of difficulty of the route

  • In ski touring, itineraries are often classified by difficulty, ranging from easy (gentle slopes, open terrain) to expert (steep slopes, technical passages). Ski touring guides, apps and specialized websites offer detailed route descriptions, with indications of slope, exposure, vertical drop and possible hazards. This information enables you to better anticipate your efforts and choose routes that suit your experience.
  • As in mountaineering, ratings can also indicate more technical sections. They take into account slope inclination, altitude and exposure to avalanche risk. For beginners, we recommend F (Easy) or PD (Low Difficulty) routes.

Start with marked or guided routes

  • If you're a beginner, it's a good idea to start with marked or frequented itineraries, which offer a safer environment. Some ski areas offer safe, avalanche-controlled touring routes. These itineraries are ideal for practicing ascents and familiarizing yourself with basic equipment and techniques.
  • A mountain guide can be a valuable resource for beginners. Not only does he or she know exactly which routes are suitable for your level, but he or she can also train you in good safety practices and advise you on technical aspects.

Adapt your ambitions to your progress

  • Ski touring is a sport that requires progressive improvement. Start modestly and increase the level of difficulty as you gain experience and improve your physical condition. After a few outings on easy routes, you can consider more complex or longer itineraries.
  • Write down your performance and impressions after each outing to keep track of your progress. This will help you to adjust your future outings according to your abilities and objectives, and to avoid overexerting yourself or putting yourself in danger.

2. EQUIP YOURSELF CORRECTLY


Find the equipment that's right for you

Lightweight equipment is essential to limit fatigue when climbing. Choose skis specifically designed for ski touring, adapted skins, lightweight boots and adjustable poles.


Touring skis and bindings

Unlike alpine skis, touring skis are lighter, making them easier to carry on long ascents. They come in different widths and lengths to suit different snow conditions and skier preferences. Wide skis offer better lift in powder, while narrower skis are easier to handle on hard snow. Visit our ski touring selection.

Touring ski bindings are specific, allowing the heel to be released when climbing and fixed when descending. We distinguish between inset bindings, which are lighter, and frame bindings, which are closer to alpine bindings but heavier. Choose a binding that's right for your level and the type of touring you're planning (short or long distances, technical routes, etc.).


Seal skins

Seal skins are indispensable for ski touring. They adhere to the sole of the ski with a special glue, enabling you to move forward without sliding backwards. They are generally made of mohair, nylon or a mixture of the two. Mohair is lighter and glides better, while nylon offers better grip and greater durability. Make sure your skins fit snugly to your skis to avoid any problems on the way up.


Adjustable poles

For ski touring, adjustable poles are preferable, as they allow you to adjust their length to suit the terrain. For ascents, a slightly longer pole length is often useful to maximize thrust, while for descents, a shorter length improves stability. Choose strong, lightweight poles, ideally with ergonomic handles and adjustable wrist straps for added comfort.

The importance of safety equipment

Always wear safety equipment avalanche beacon, shovel and probe. Learn how to use them properly and train regularly.


Safety equipment: avalanche beacon, shovel and probe

The Avalanche Victim Locator is used to locate people buried under snow. Always wear it under your clothes, switched on and properly adjusted. It's essential to know how to use it, and to practice searching for victims regularly.
A lightweight shovel, preferably aluminum, is essential for digging quickly in the event of an avalanche. It should be solid and ergonomic, with a telescopic handle if possible.
A probe enables you to pinpoint the exact location of a person under the snow after initial detection with the avalanche transceiver. Choose a probe between 240 and 320 cm in length, easy to deploy and durable.

These three pieces of safety equipment are indispensable for any off-piste outing, even on short or reputedly safe routes. You'll find your safety equipment at the following brands: Ortovox, Arva and Mammut.

Technical for your ski touring outings

Dress in several layers so you can adjust the warmth according to the effort involved. Breathable clothing is important to avoid getting drenched in perspiration.


Suitable clothing: the 3-layer system

Base layer: technical underwear made from breathable materials (such as merino wool or synthetic fabrics) to wick away perspiration. It's important to stay dry to avoid getting cold when you stop.
Mid-layer: A lightweight fleece or down jacket to provide warmth. Down jackets are light and warm, but less effective in wet conditions. Windproof softshell jackets are also popular for hiking.
Outer layer: A waterproof, breathable jacket to protect you from wind, snow and moisture. Choose a jacket with ventilation zips, as climbing is often intense and makes you sweat.
Pants: Hiking pants, ideally wind- and water-repellent, with ventilation zips. Some models are reinforced at the bottom of the legs to prevent cuts from ski edges.

Accessories are also essential

Opt for warm, lined, water-resistant gloves, as well as a thinner pair for climbing. Hands get cold quickly in the mountains, so it's crucial to protect them.
Opt for a cap or headband and/or a neck warmer to protect the head and neck from the cold. Thin, breathable hats are ideal under helmets for downhill riding.
The importance ofsunglasses and/or ski goggles. The sun's reflection on the snow is intense in the mountains. Category 3 or 4 goggles are essential for ascents, and an anti-fog mask is practical for descents in bad weather.
A 20 to 35-liter bag is ideal, with straps to secure the skis in "portage" mode. It should be large enough to hold safety equipment, extra clothing, water, snacks and a first-aid kit.


ski de randonnée


3. MONITOR WEATHER CONDITIONS AND AVALANCHE RISK

Before setting off, check the weather forecast and the avalanche risk in your area. Avalanches are a real danger in ski touring, and snow conditions change rapidly. If the risk is high, it's best to postpone your outing or choose a safer route.
Monitoring weather conditions and avalanche risk is one of the most important steps in preparing a ski touring outing. The mountains are an ever-changing environment, and conditions can change rapidly, transforming a pleasant route into a dangerous zone. Here are the main reasons why it's crucial to be well informed, as well as best practices for interpreting and using this information:

Check the weather report before setting off

Mountain weather conditions can vary rapidly, and sudden changes can make progress difficult or impossible. Before setting off, it's essential to consult a mountain-specific weather report, available on sites such as Météo France or dedicated apps.

The key elements to watch out for are
Temperature: the cold can be extreme at altitude, especially if you take the wind into account. Low temperatures also increase the risk of frostbite and hypothermia.
Wind: Gusts of wind can not only make progress difficult, they also carry snow, creating dangerous accumulations on slopes, increasing the risk of avalanche.
Precipitation: Recent snowfalls often increase the risk of avalanches. Fresh snow needs time to stabilize and form a coherent snowpack.
Visibility: Snow, fog or low clouds reduce visibility, making navigation more difficult and increasing the risk of getting lost or straying off course.

Study the Avalanche Bulletin (BRA)

The Avalanche Risk Bulletin (BRA) is an indispensable tool for all ski tourers. It provides detailed information on the avalanche risk in a given area, ranging from 1 (low) to 5 (very high). This risk level must be carefully analyzed to determine whether conditions are favorable or not.

Risk level: For less experienced skiers, it is advisable to avoid outings when the risk level is higher than 2 (limited). Even with a risk level of 3 (high), it is advisable to choose routes without steep slopes or with low exposure.
Snow type and stability: The avalanche bulletin also details snow stability (powder, wind slab, transformed snow) and slab formation. Wind slabs, for example, are particularly dangerous, as they can easily fall off.
Orientation and altitude of slopes at risk: The BRA often indicates altitudes and exposures where avalanche risk is greatest. For example, some north-facing slopes may accumulate layers of unstable snow, while south-facing slopes may be safer after exposure to the sun.

Assess the terrain and adapt your route according to conditions

Even if general conditions are favorable, some areas are more likely to trigger avalanches. It's essential to identify slopes of over 30 degrees, couloirs, and areas where snow could accumulate (such as hollows or areas below ledges).
In the field, look for signs that indicate instability: cracks in the snow, muffled rumbling underfoot, and other clues may indicate that the snow is under tension. If signs of instability are present, it's best to turn back or avoid steep slopes.
You should also adapt your route according to the directions indicated as risky in the avalanche bulletin. For example, if east-facing slopes present a risk, opt for west- or north-facing slopes if they are safer.

Be prepared to cancel or modify your outing

Flexibility is essential in ski touring. If the weather is unstable or the avalanche risk is too high, it's best to postpone your outing or choose a less exposed route. It's better to give up than to expose your safety unnecessarily.
It may also be a good idea to prepare several route options: a main route, but also alternative routes of lesser difficulty or better protection, to be used in the event of worsening conditions. For example, opt for a gentler slope or a different orientation if the weather doesn't match the initial forecast.

Be aware of seasonal variations and snow conditions

Snow conditions change with the seasons. At the start of the season, the snowpack is often thin and unstable, while at the end of the season, spring snow can be heavy and wet, increasing the risk of avalanche melt.
During or just after a snowfall, the risk is generally higher. Allow a few days for the fresh snow to stabilize. In periods of thaw, when temperatures rise sharply, spontaneous avalanches are more frequent.

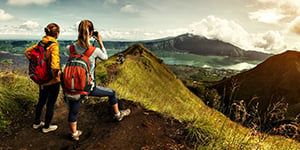
Talk to local experts and other hikers

Local experts, such as mountain guides, huts or other hikers, can provide you with valuable information on current conditions and areas to avoid. In the mountains, the exchange of information between hikers is essential, as actual conditions may differ from those forecast.

Forums, social networks and ski touring apps also allow you to consult feedback from other skiers, who can share their experiences and observations in real time.

4. LEARN ASCENT AND DESCENT TECHNIQUES


Climbing techniques: taming effort and optimizing energy

Conversion technique is essential for climbing steep slopes without skidding. The ascent must be regular, without excessive effort.

Ski touring ascents are often long and physically demanding, especially on steep slopes and varied terrain. Mastering climbing techniques not only helps you manage your energy, but also reduces the risk of slipping and fatigue.

Putting on skins
: Skins are indispensable when climbing. They adhere to the base of the skis and prevent recoil. It's essential to fit them properly: they must cover the sole of the skis without protruding over the edges, to ensure good grip without impeding glide.
The duck step technique: To negotiate steeper slopes, place the skis in a "V" (points outwards) and progress by shifting one ski then the other, as if climbing a staircase. This technique reduces the risk of sliding and distributes effort more evenly.
The conversion turn: Conversion is an essential technique for changing direction on steep slopes. It consists of turning on the spot by pivoting the upstream ski (the ski on the side of the slope) in the desired direction, then bringing the downstream ski next to the other. This maneuver requires a little practice to be fluid and stable, but it's essential for efficient progress on steep slopes.
Regularity of steps: When climbing, adopt a regular and constant rhythm, without forcing yourself too much, to save your energy. Use small steps and adapt your speed to maintain controlled breathing. Avoid taking long strides, as they quickly exhaust your legs and are less effective.

Downhill techniques: adapting your style to snow conditions

Downhill ski touring takes place on ungroomed terrain, with a variety of snow types (powder, crusty, heavy, icy, etc.) that require technical adaptations compared to alpine skiing. Here are the key downhill techniques to master:

The parallel turn
: The parallel turn is the basic turn for descending in powder or hard snow. In ski touring, the challenge is to adapt the width of turns to the slope and natural obstacles (trees, rocks). Wider turns mean better speed control on gentle slopes.
Body position: When touring, your weight should be slightly backwards in deep snow to prevent the skis from sinking too much. In hard snow, adopt a more centered posture for better edge grip.
Sculling: In narrow terrain or dense with obstacles, sculling (a series of short, fast turns) helps you keep control of your speed. To succeed, engage your knees and hips, and keep your skis close together for a fluid sequence.
Adapting to variable snow: In crusty snow, which is unstable and difficult to maneuver, maintain a slow pace and press firmly to avoid skids. In heavy snow, concentrate on wide turns and strong edge pressure to prevent skis from catching.

ski de randonnée


5. NEVER SET OFF ALONE AND INFORM SOMEONE OF YOUR ITINERARY

For safety reasons, we strongly recommend that you set off in a group. In the event of a problem, it will be much easier to deal with the unexpected. Always inform someone of your itinerary and expected time of return.


The advantages of group travel

Mutual assistance: In the event of a problem (injury, loss of direction, changing snow conditions), group members can support each other and provide immediate help. For example, in the event of injury, one team member can alert emergency services while another stays with the injured person.
Sharing responsibilities: Group members can take turns reading the map, monitoring weather conditions, or checking for avalanche risk. A well-organized group also reduces mental and physical fatigue, especially on long ascents or technical descents.
Improved avalanche safety: In avalanche-prone areas, each person can carry an avalanche transceiver, shovel and probe, increasing the chances of locating and rescuing an avalanche victim. As rapid intervention is essential, a well-equipped and trained rescue group can act effectively.
Encouragement and motivation: When hiking, mental support is important, especially in moments of fatigue or doubt. A group can keep morale up and motivate you to reach your goal.

Tell someone you trust about your route

Describe the route precisely: Give detailed information about your route, including starting point, summit or planned arrival point, intermediate points and return route. This will help the rescue team to find you if you don't make it back in time.
Specify times: Indicate your planned departure time, estimated duration, and the time you expect to be back. In the event of a delay, the person informed will be able to assess when to sound the alarm.
Leave instructions if there's no news: Inform your contact of the steps to take if there's no news at the scheduled time, such as contacting the emergency services or checking with huts close to your route. If you have a GPS or live tracking app, you can also share your location in real time.

Training in first aid and mountain safety

First aid knowledge: In the event of injury or discomfort, knowing how to administer first aid is vital. Mountain-specific first-aid training courses teach you the essentials: treating injuries, managing hypothermia, and keeping the victim safe until help arrives.
Avalanche rescue training: Even with a good knowledge of avalanche risks, accidents can still happen. Training in the use of avalanche transceivers, shovels and probes, as well as in avalanche search techniques, considerably increases the chances of survival in the event of an avalanche. Many clubs and organizations offer avalanche safety training days for ski tourers.

BONUS: RESPECT NATURE AND WILDLIFE

Ski touring immerses you in sometimes sensitive natural areas. Respect protected areas, and take care not to disturb wildlife, especially in winter, when animals are more vulnerable.

By following these tips, you'll maximize your safety and enjoyment, while respecting the environment. We wish you a safe and enjoyable trip!


contactez nous